Anyone learning the guitar always has a hard time deciding where to start. Basic open chords are one of the most crucial things for beginning guitar players to learn.
Improve your fretting and strumming skills with these chords that form the backbone of so many popular tunes.
The most popular open chords for beginners will be covered in this blog post, along with instructions on how to play them, practice advice, and solutions to common issues. This tutorial is for you, whether you’re a beginner or want to review the fundamentals.
What are Basic Open Chords?
Basic open chords are chords that are played using open strings, meaning that at least one string is played without any fingers pressing down on the frets. Many popular songs use these chords, making them essential for guitarists.
Open chords are different from barre chords, which involve using a finger to press down multiple strings across the fretboard. Barre chords require more finger strength and dexterity and can be difficult for beginners to master. Therefore, it’s essential to learn basic open chords before moving on to barre chords.
Each basic open chord is made up of several elements: the root note, the third, and the fifth. The root note is the main note of the chord, which determines its name. The third and fifth notes create the harmony of the chord.
Open chords can be written in chord diagrams, which show the frets and strings that need to be pressed down and which strings should be played open. At first, the chord grid can be hard to understand, but with practice, it becomes a simple way to see chords.
Learning basic open chords is crucial for developing your guitar skills and playing popular songs. You can master these chords with a little practice and then move on to more advanced methods like fingerpicking and soloing.
So take out your guitar, and let’s begin! Before I get started, grab your tuner and tune up your guitar.
Open Strings
E A D G B E
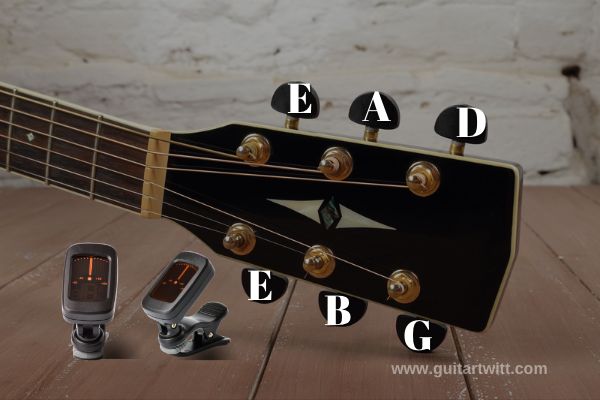
Your tuner will tell you what note you are hitting when you pluck the string. For example, tuning the E string If it’s tuned low, it will be in the red, saying D#. So tighten the string, turning your tuner higher. Always remember Lefty Loosey. Righty Tighty. If it’s too high, say F or F# to loosen your tension. The same applies to all other strings. Good luck with your guitar adventures.
The Most Common Basic Open Chords for Beginners
As a beginner guitarist, it’s important to start with the most common and essential open chords. Here are five basic open major chords that every beginner should know:
Open Major Chords
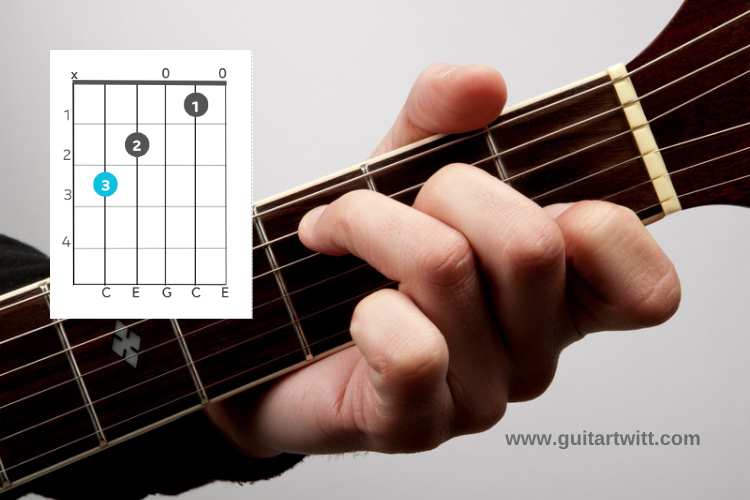
C Major:
E---0–----------|
B---1–----------|
G---0–----------|
D---2-----------|
A---3–----------|
E---x-----------|
This chord is played by placing the third finger on the third fret of the fifth string, the second finger on the second fret of the fourth string, and the first finger on the first fret of the second string. The other strings are played open.
D Major:
E–2–-----------|
B–3–-----------|
G–2–-----------|
D–0–-----------|
A–x–-----------|
E–x–-----------|
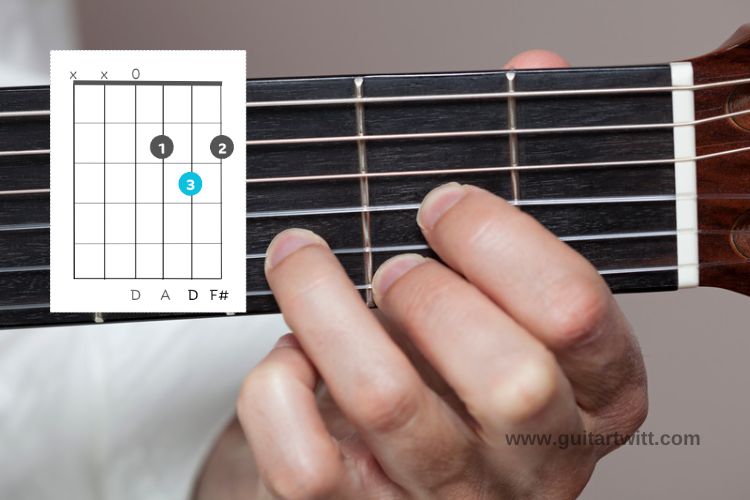
This chord is played by placing the first finger on the second fret of the third string, the third finger on the third fret of the second string, and the second finger on the second fret of the first string. The other strings are played open.
E Major:
E–0–----------|
B–0–----------|
G–1–----------|
D–2–----------|
A–2–----------|
E–0–----------|
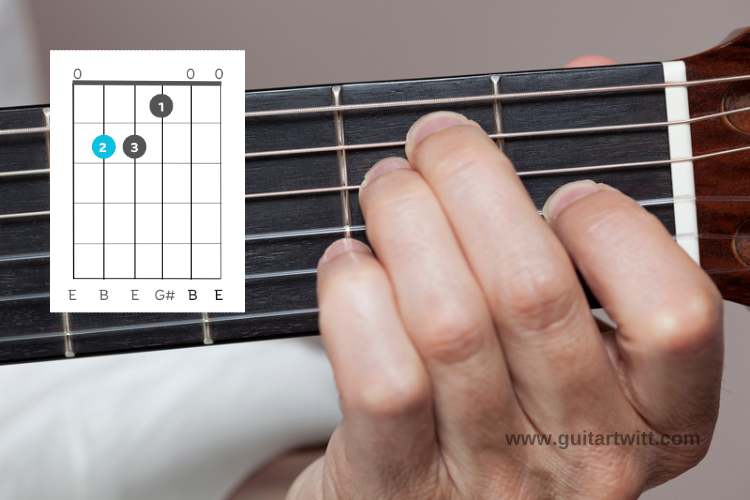
This chord is played by placing the first finger on the first fret of the third string, the second finger on the second fret of the fifth string, and the third finger on the second fret of the fourth string. The other strings are played open.
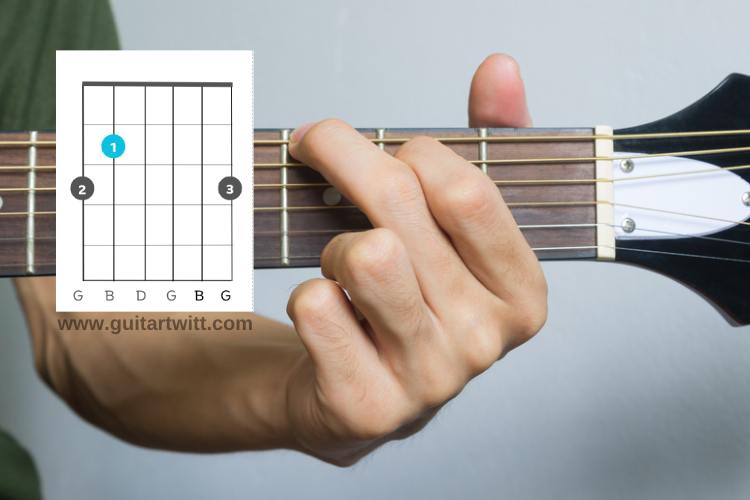
G Major:
E–3–-----------|
B–0–-----------|
G–0–-----------|
D–0–-----------|
A–2–-----------|
E–3–-----------|
This chord is played by placing the second finger on the third fret of the sixth string, the first finger on the second fret of the fifth string, and the third finger on the third fret of the first string, The other strings are played open.
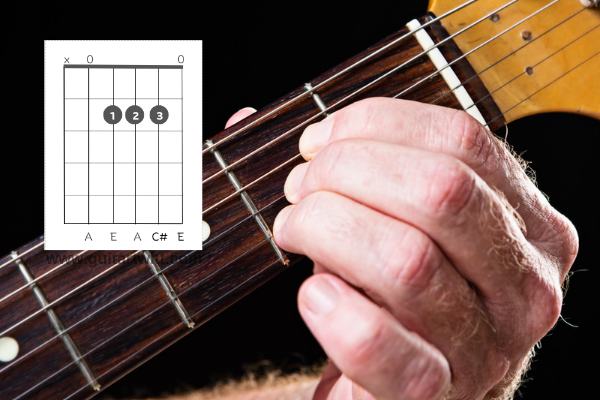
A Major:
E–0–-----------|
B–2–-----------|
G–2–-----------|
D–2–-----------|
A–0–-----------|
E–x–-----------|
This chord is played by placing the first finger on the second fret of the fourth string, the second finger on the second fret of the third string, and the third finger on the second fret of the second string. The other strings are played open.
Open Minor Chords
Here are the three most common open minor Chords.
A Minor
E–0–----------|
B–1–----------|
G–2–----------|
D–2–----------|
A–0–----------|
E–x–----------|
This chord is played with an open “A” note on the fifth string by placing the second finger on the second fret of the fourth string, the third finger on the second fret of the third string, and the second finger on the second fret of the second string. The first string will be played open, while the sixth string is not to be played.

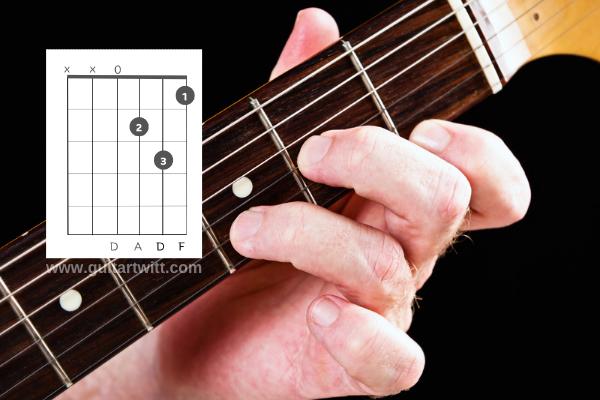
D Minor
E–1–------------|
B–3–------------|
G–2–------------|
D–0–------------|
A–x–------------|
E–x–------------|
This chord is played by placing the first finger on the first fret of the first string, the second finger on the second fret of the third string, and the third finger on the third fret of the second string. The fourth string is played open. The fifth and sixth strings remain mute.
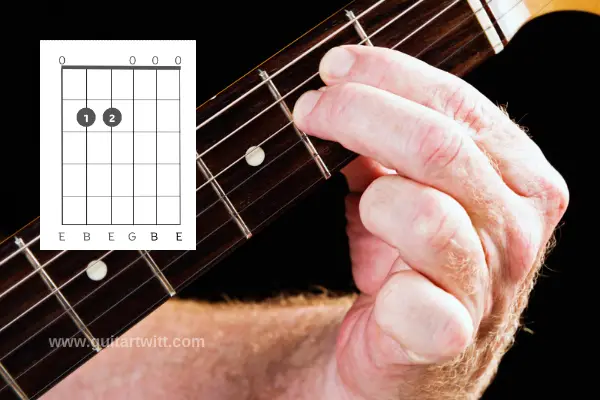
E minor
E–0–-----------|
B–0–-----------|
G–0–-----------|
D–2–-----------|
A–2–-----------|
E–0–-----------|
This chord is played by placing the second finger on the second fret of the fifth string, and the third finger on the second fret of the fourth string. The other strings are played open.
These are minor chords, which produce a sound distinct from major chords. Different musical genres, including rock, pop, and folk widely use these chords.
As with major chords, it is essential to practice performing these chords individually and then transitioning between them to develop muscle memory and enhance your chord changes. You will be able to play these chords with fluidity and ease after sufficient practice and repetition.
Adding these three fundamental open chords to your repertoire will increase your understanding of chord theory and expand your ability to play a variety of songs.
Tips for Switching Between Chords
As we know, practice makes perfect. At first, slowly switch from one chord to another. Set aside some time each day to work on your chord transitions, and aim to gradually increase your speed and accuracy.
- Start slow
When you’re first learning a new chord progression, start by playing it slowly. Focus on getting the finger placement and strumming pattern correct, and gradually increase your speed as you become more comfortable.
- Use a metronome:
Using a metronome can help you develop a sense of rhythm and timing, which is very important. Start with a slow tempo and gradually increase the speed as you become more comfortable with the chord progression.
- Visualize the chord shapes:
As you transition between chords, visualize the shape of the next chord in your mind before you play it. This can help you prepare your fingers for the next chord and make the transition smoother.
- Practice common chord progressions:
Many songs use similar chord progressions, so practicing common progressions can help you become more comfortable with switching between chords. For example, the chord progression G – D – Em – C is used in many popular songs.
- Use a chord chart or diagram:
Keep a chord chart or diagram handy so that you can quickly reference finger placement and chord shapes as you practice. This can help you avoid mistakes and make transitions go more smoothly.
Remember, switching between chords takes time and practice. Don’t get discouraged if it takes a while to master a particular chord progression. Keep practicing and be patient with yourself, and you’ll eventually develop the muscle memory and skill needed to switch between chords with ease.
Troubleshooting Common Chord Problems
Not pressing down on the strings firmly enough or failing to position your fingers correctly can result in buzzing or muted strings. To troubleshoot, try pressing down harder on the strings and double-checking your finger placement.
Strumming too hard: Strumming too hard can cause the strings to buzz or sound muddy. To troubleshoot, try strumming more lightly or using a lighter pick.
Difficulty with chord transitions: Difficulty with chord transitions is common for beginners. To troubleshoot, practice transitioning between chords slowly and deliberately. Focus on proper finger placement and try to minimize any pauses or breaks between chords.
Fingers touching adjacent strings: This can cause the adjacent strings to be muted or produce a buzzing sound. To troubleshoot, make sure your fingers are not touching any adjacent strings and that they are pressing down firmly on the strings.
ALSO READ:
How To Fix Annoying Sound Buzz on Your Electric Guitar
Pain or discomfort in fingers: Playing guitar can be tough on your fingers, especially in the beginning. To troubleshoot, take frequent breaks and stretch your fingers regularly. Gradually build up your playing time as your fingers become stronger.
To master these chords, it’s important to practice playing them individually, making sure that each string sounds clear and distinct. Once you feel comfortable with each chord, try practicing transitioning between them to develop your muscle memory and improve your chord changes.
By learning these common basic open chords, you’ll be able to play many popular songs and develop the foundational skills necessary to progress as a guitarist.
Here are some examples of using these chords. Enjoy!
Last Dance With Mary Jane (Tom Petty Verse Intro)
Am/Am/G/G/D/D Repeat.
Wild Thing/Louie Louie
GG/CC/DD/CC
Dyer Maker (Led Zeppelin) Verse
C/C Am/Am/F/F/G/G Repeated.
Good luck. And please remember, have fun!